Free Pattern - Crochet Cotton Throw Pillow
Free Throw Pillow Pattern
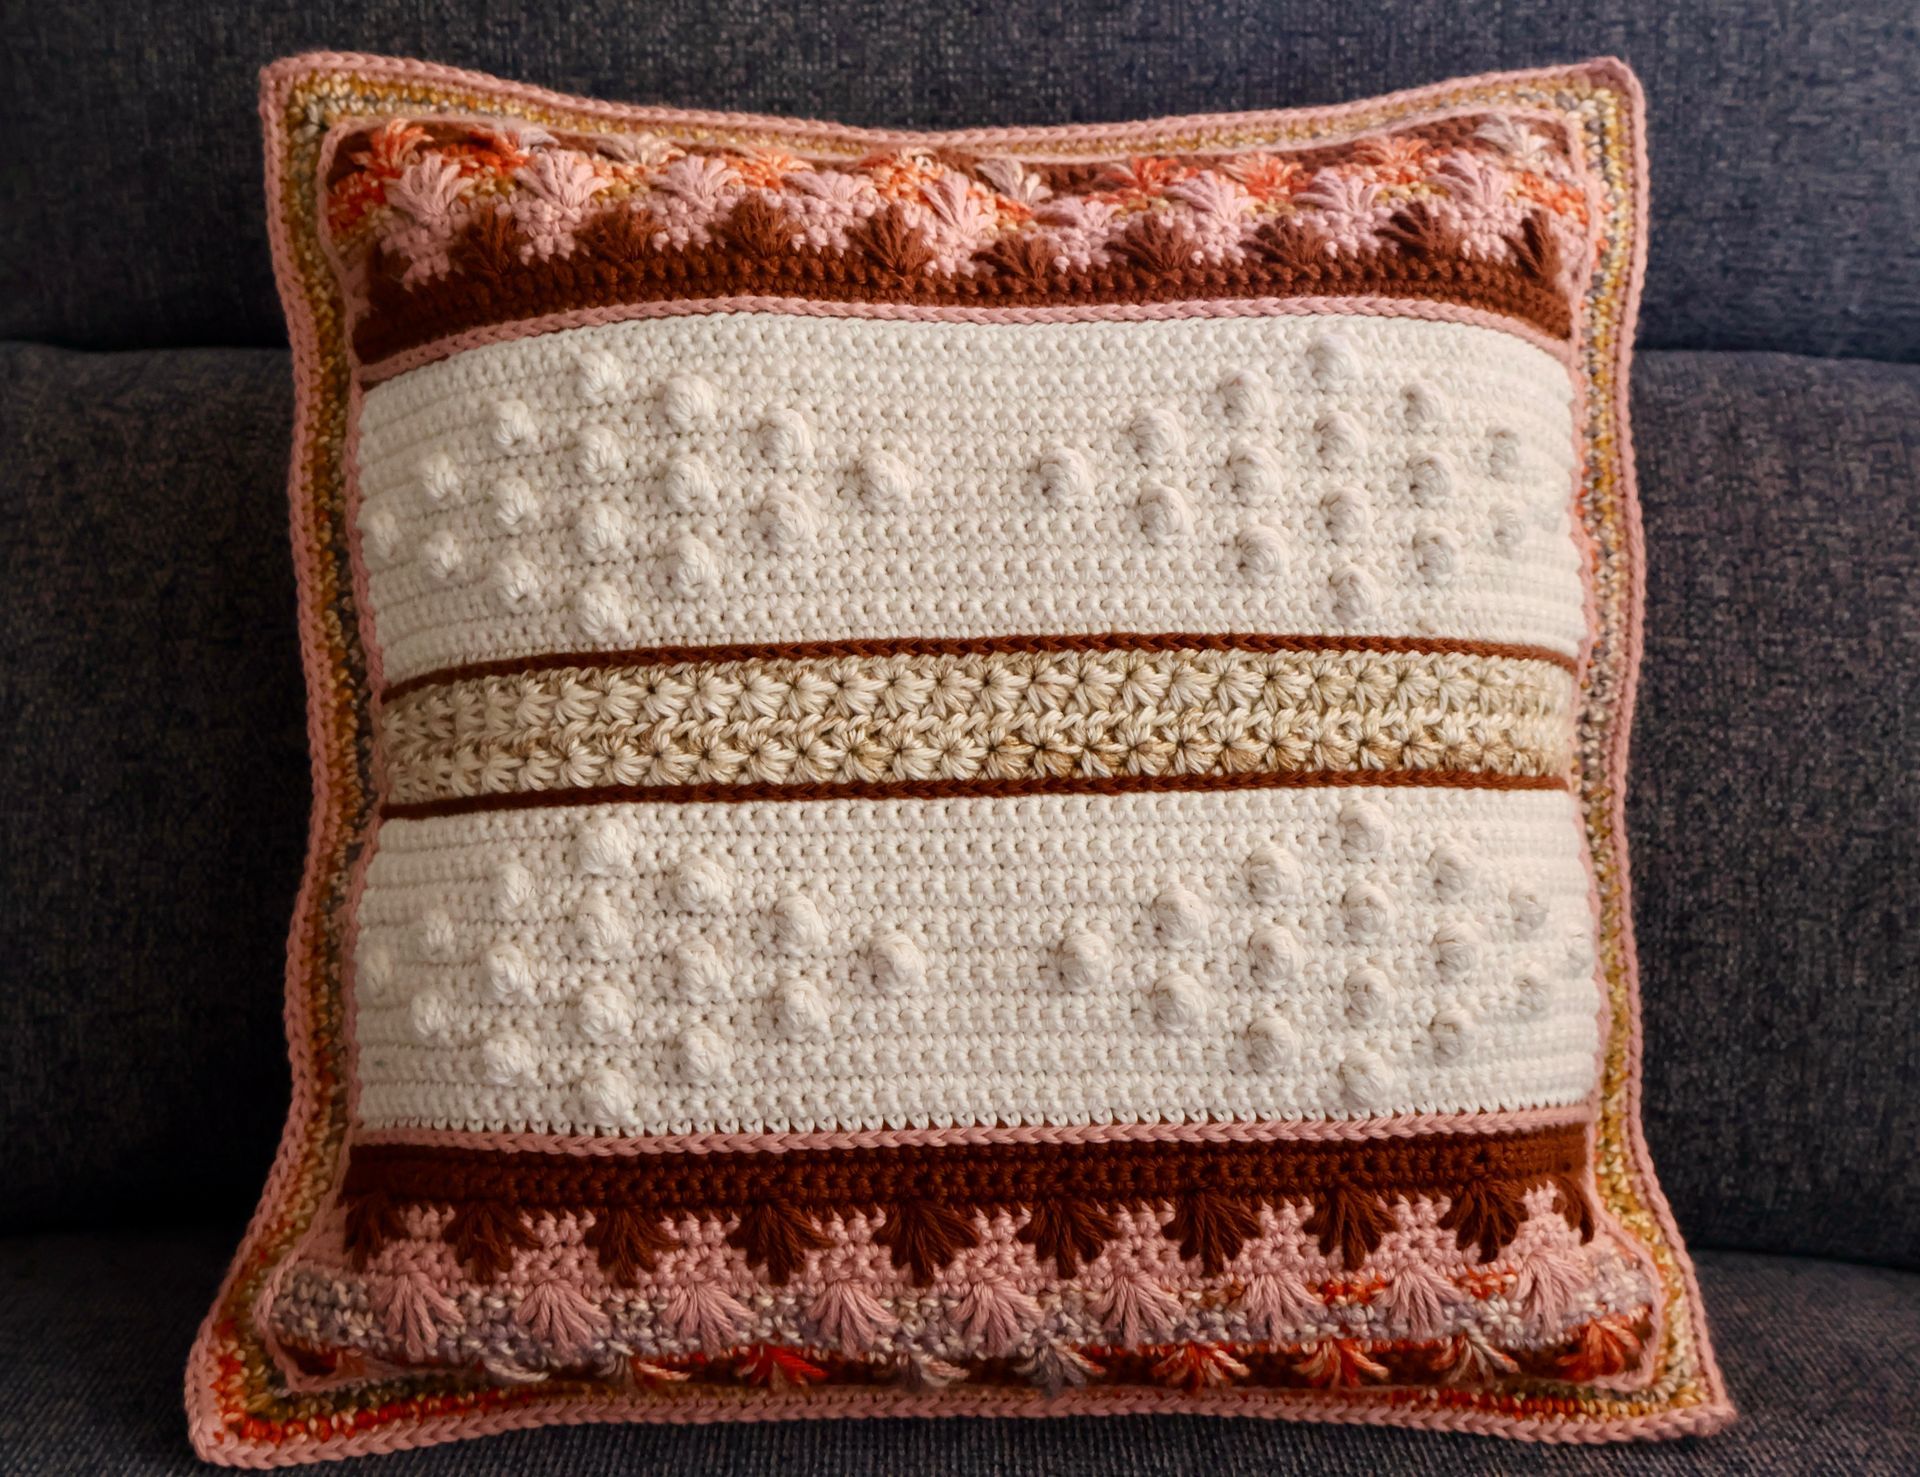
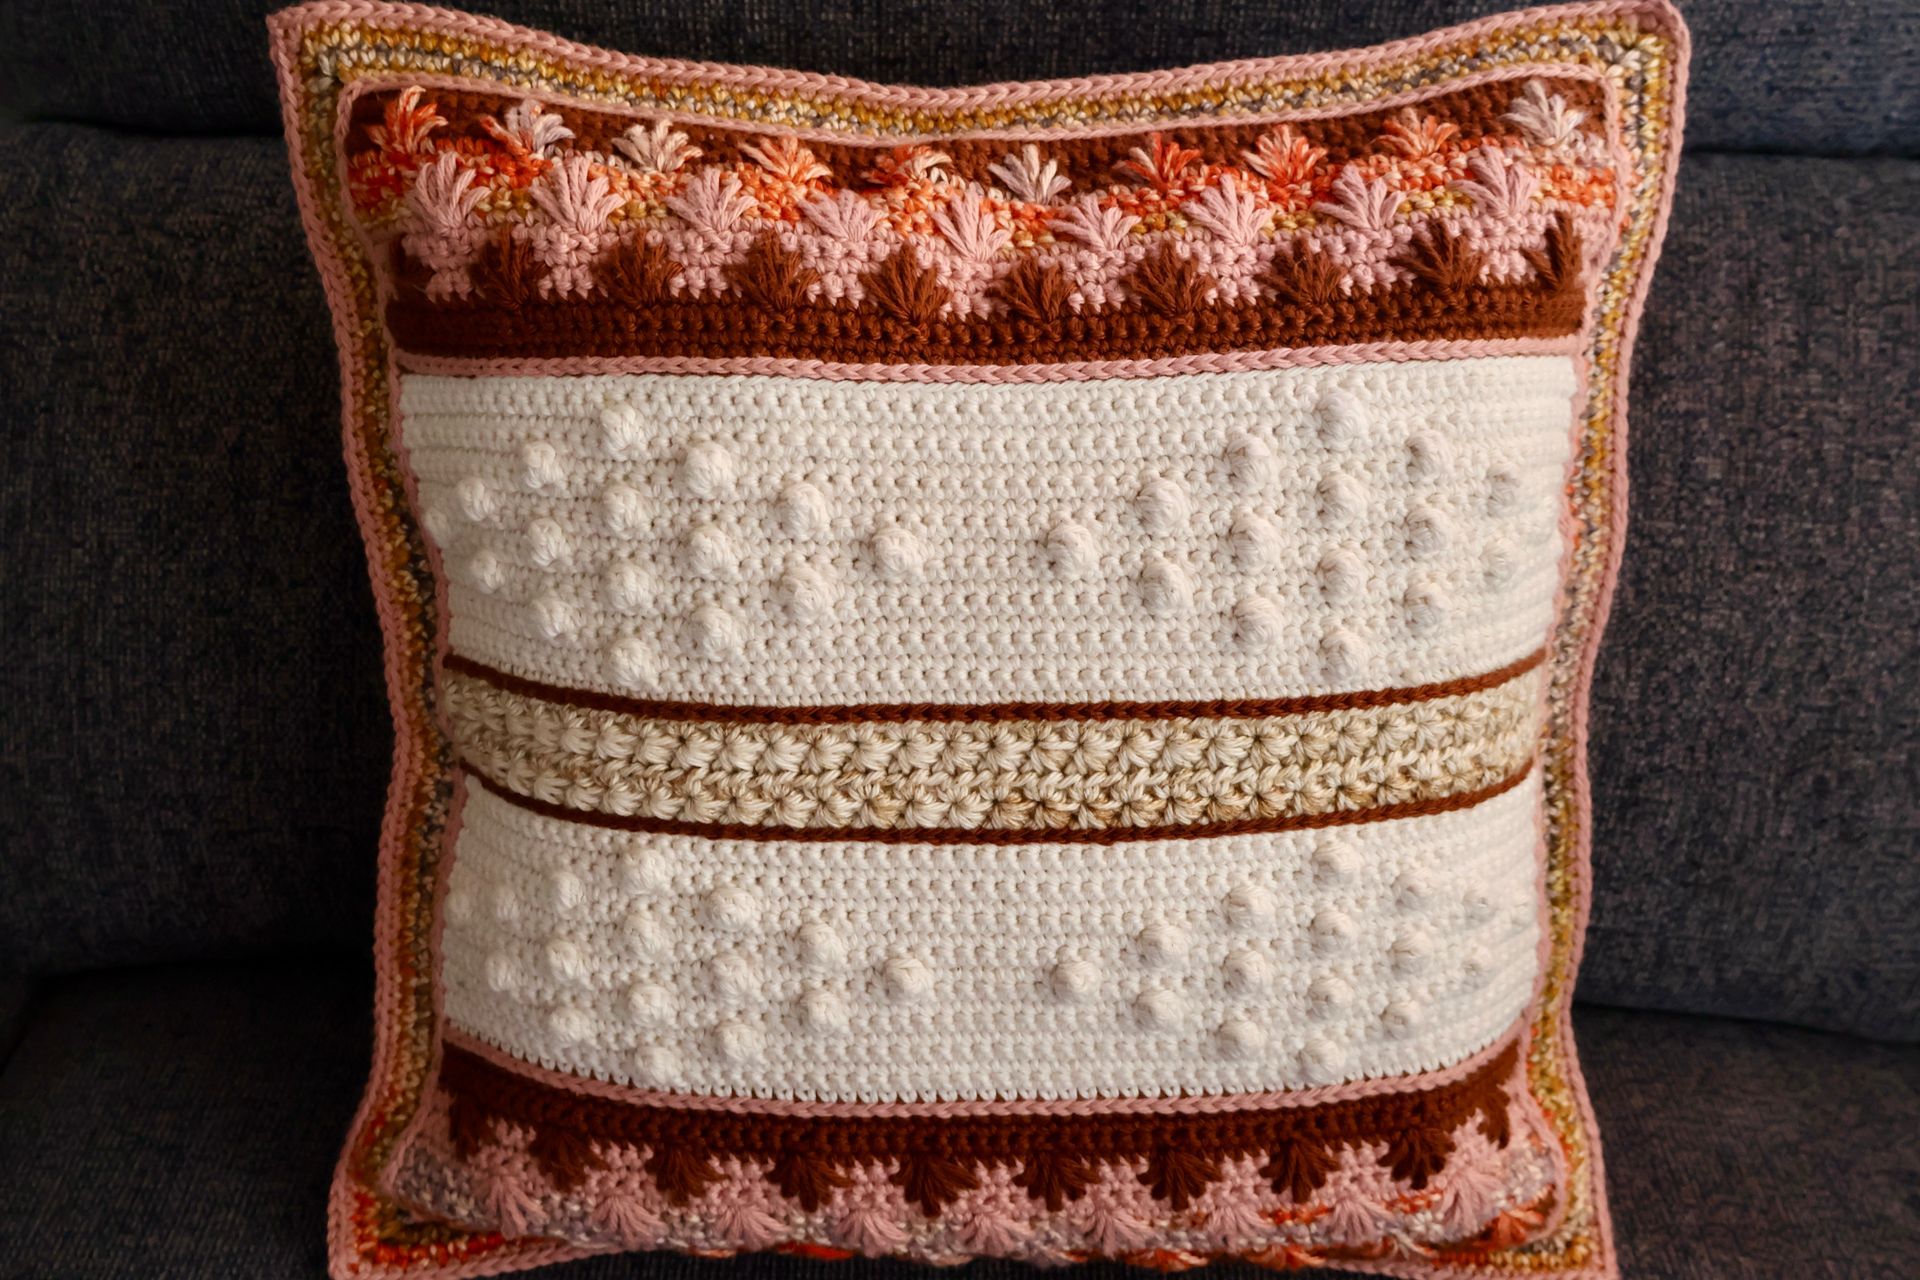
Dusty Desert Throw Pillow
There’s something satisfying about making something with your hands—especially when it's cozy and pretty. This crochet pillow is one of my recent favorite projects, and I wanted to share a little about how it came together.
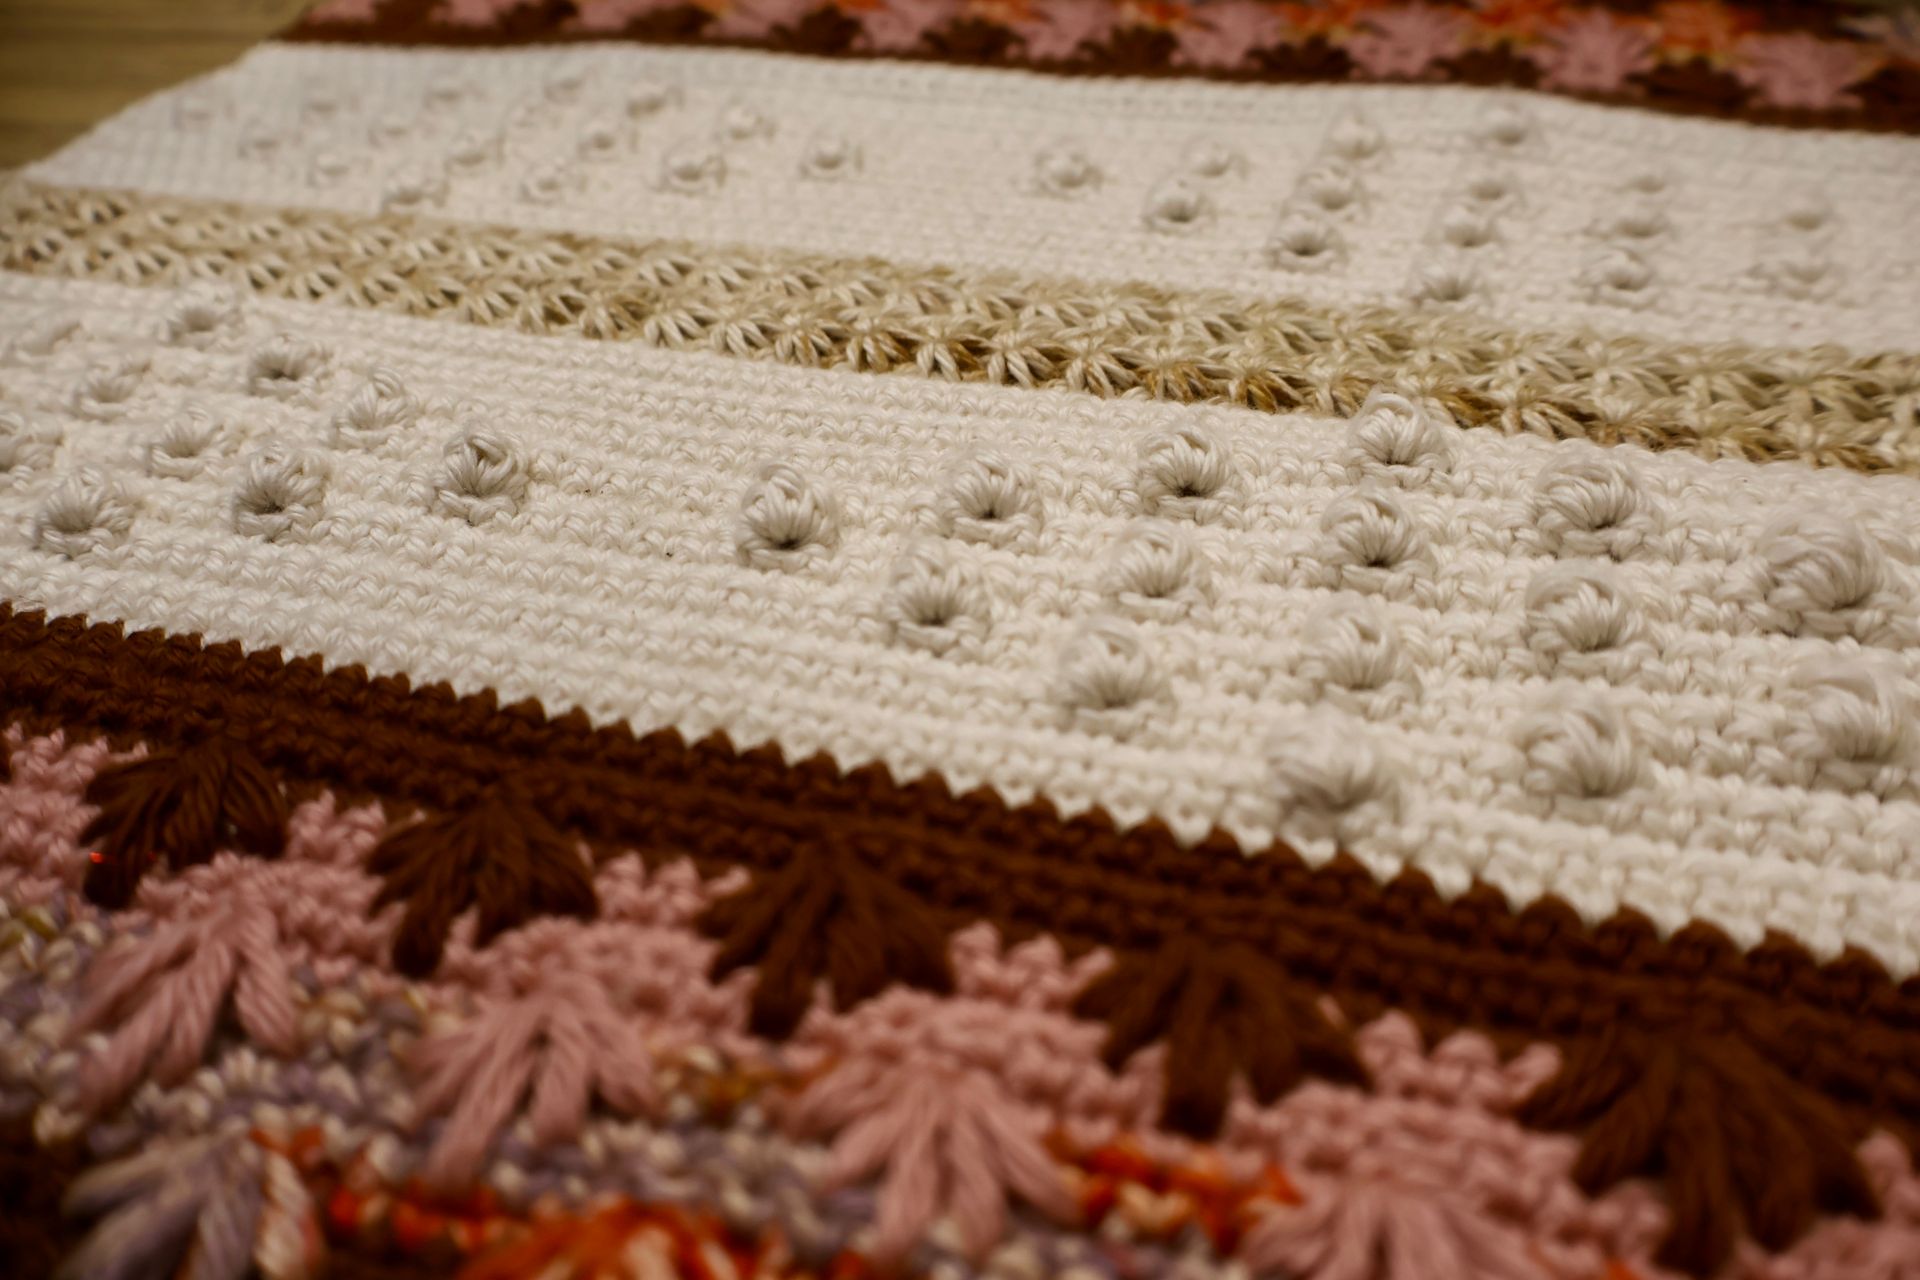
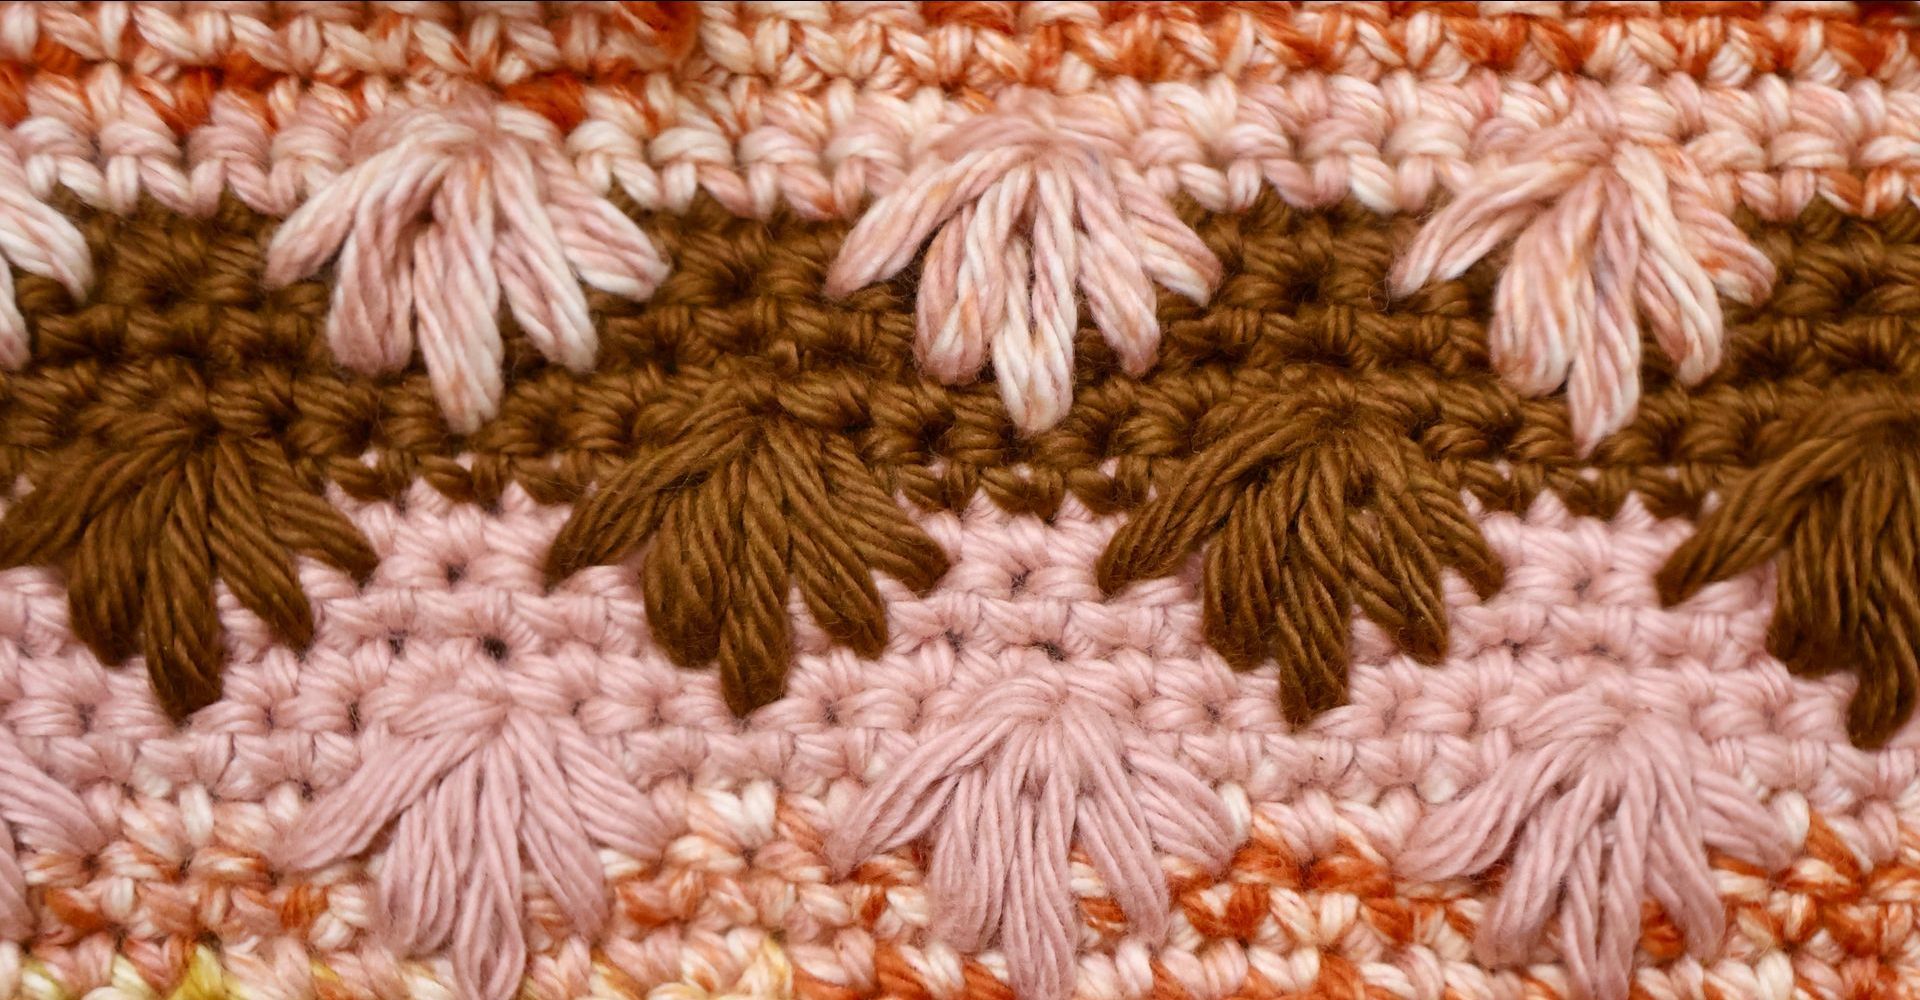
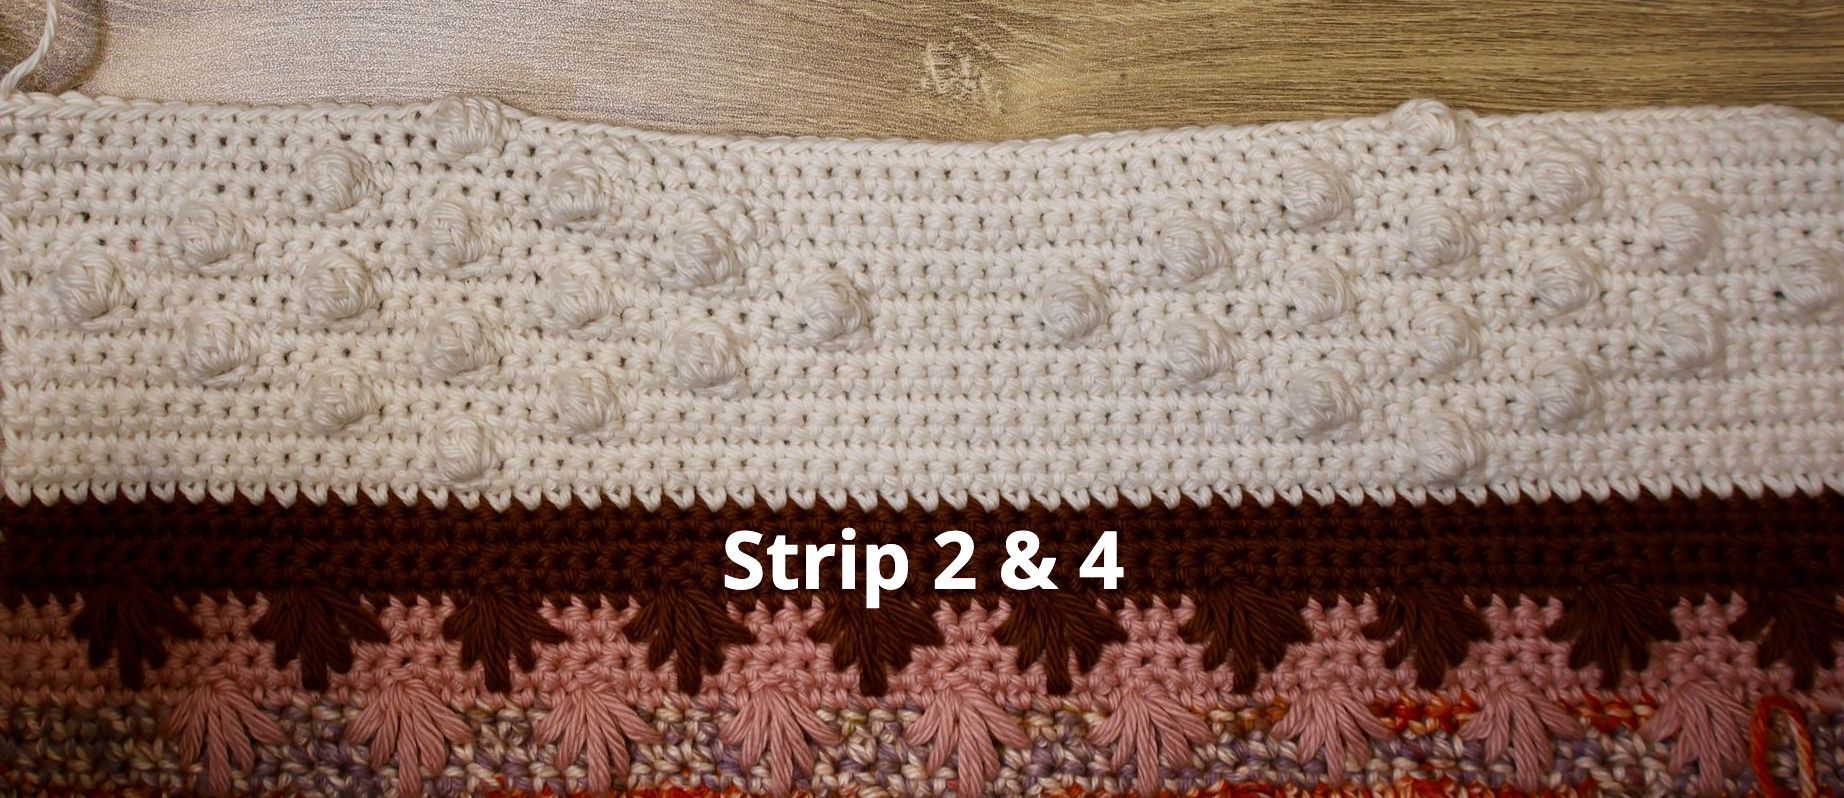
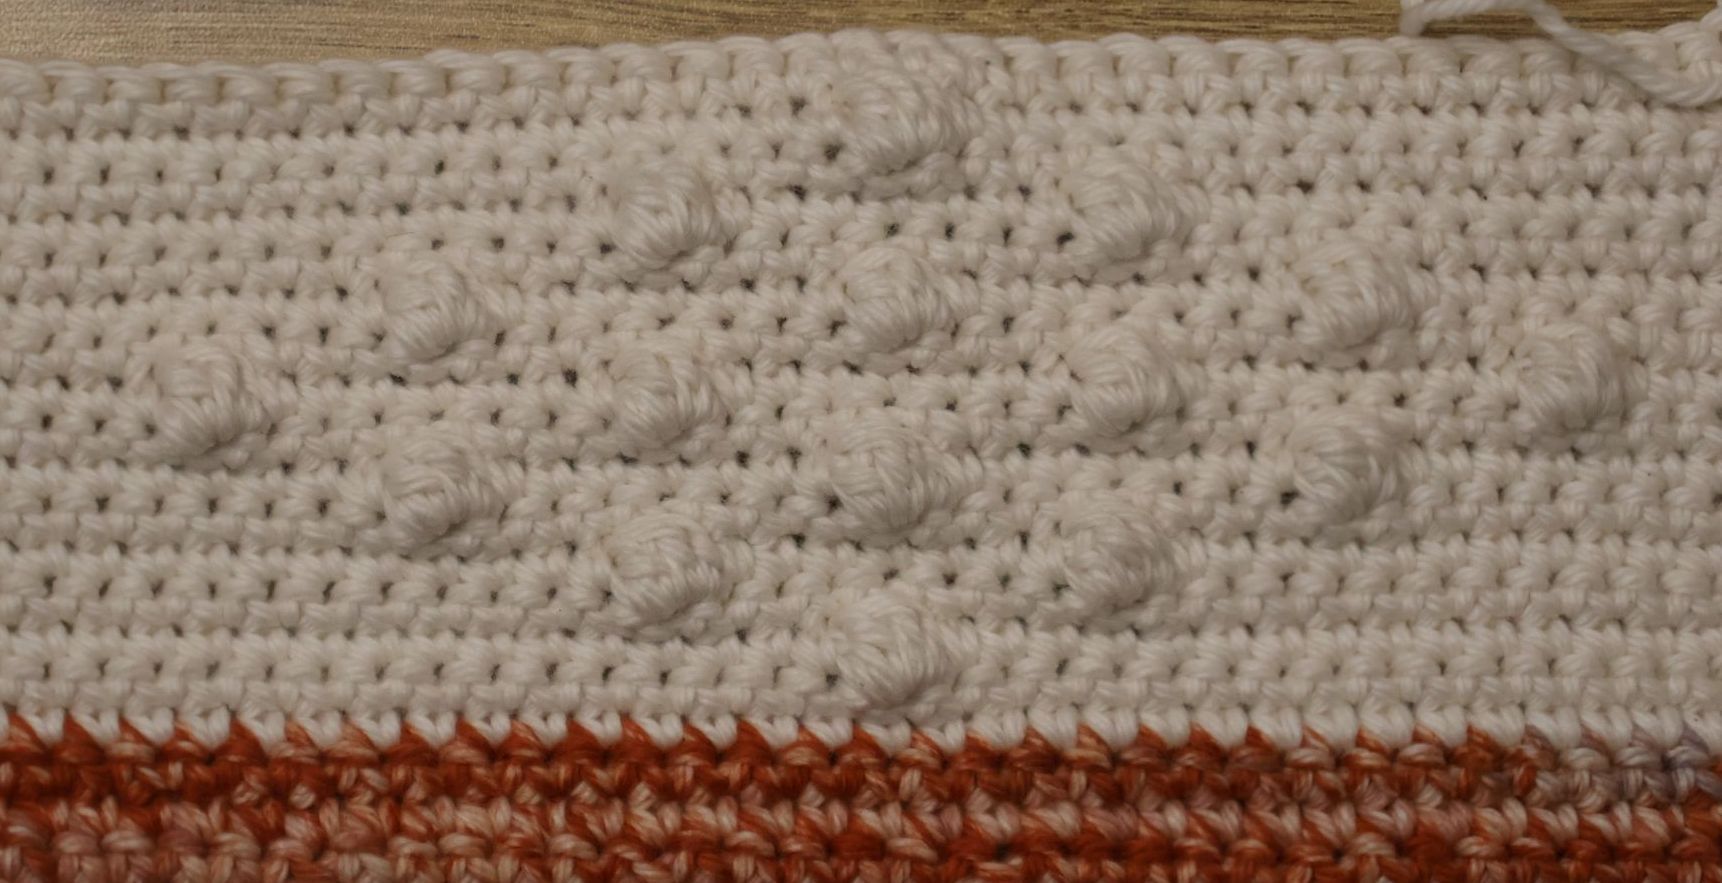
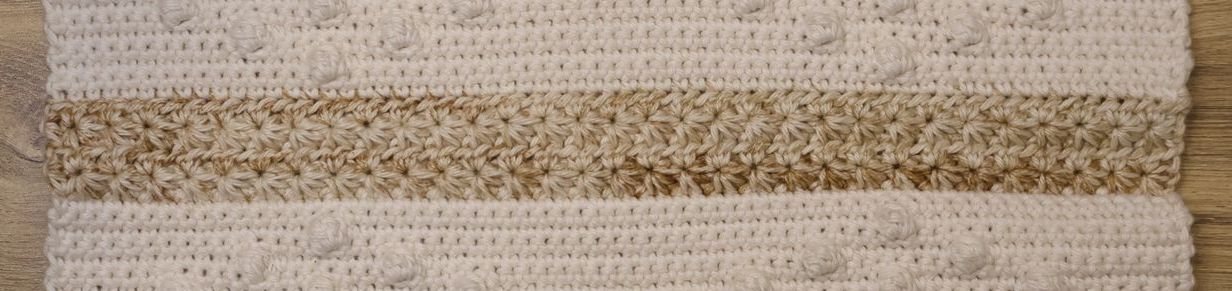
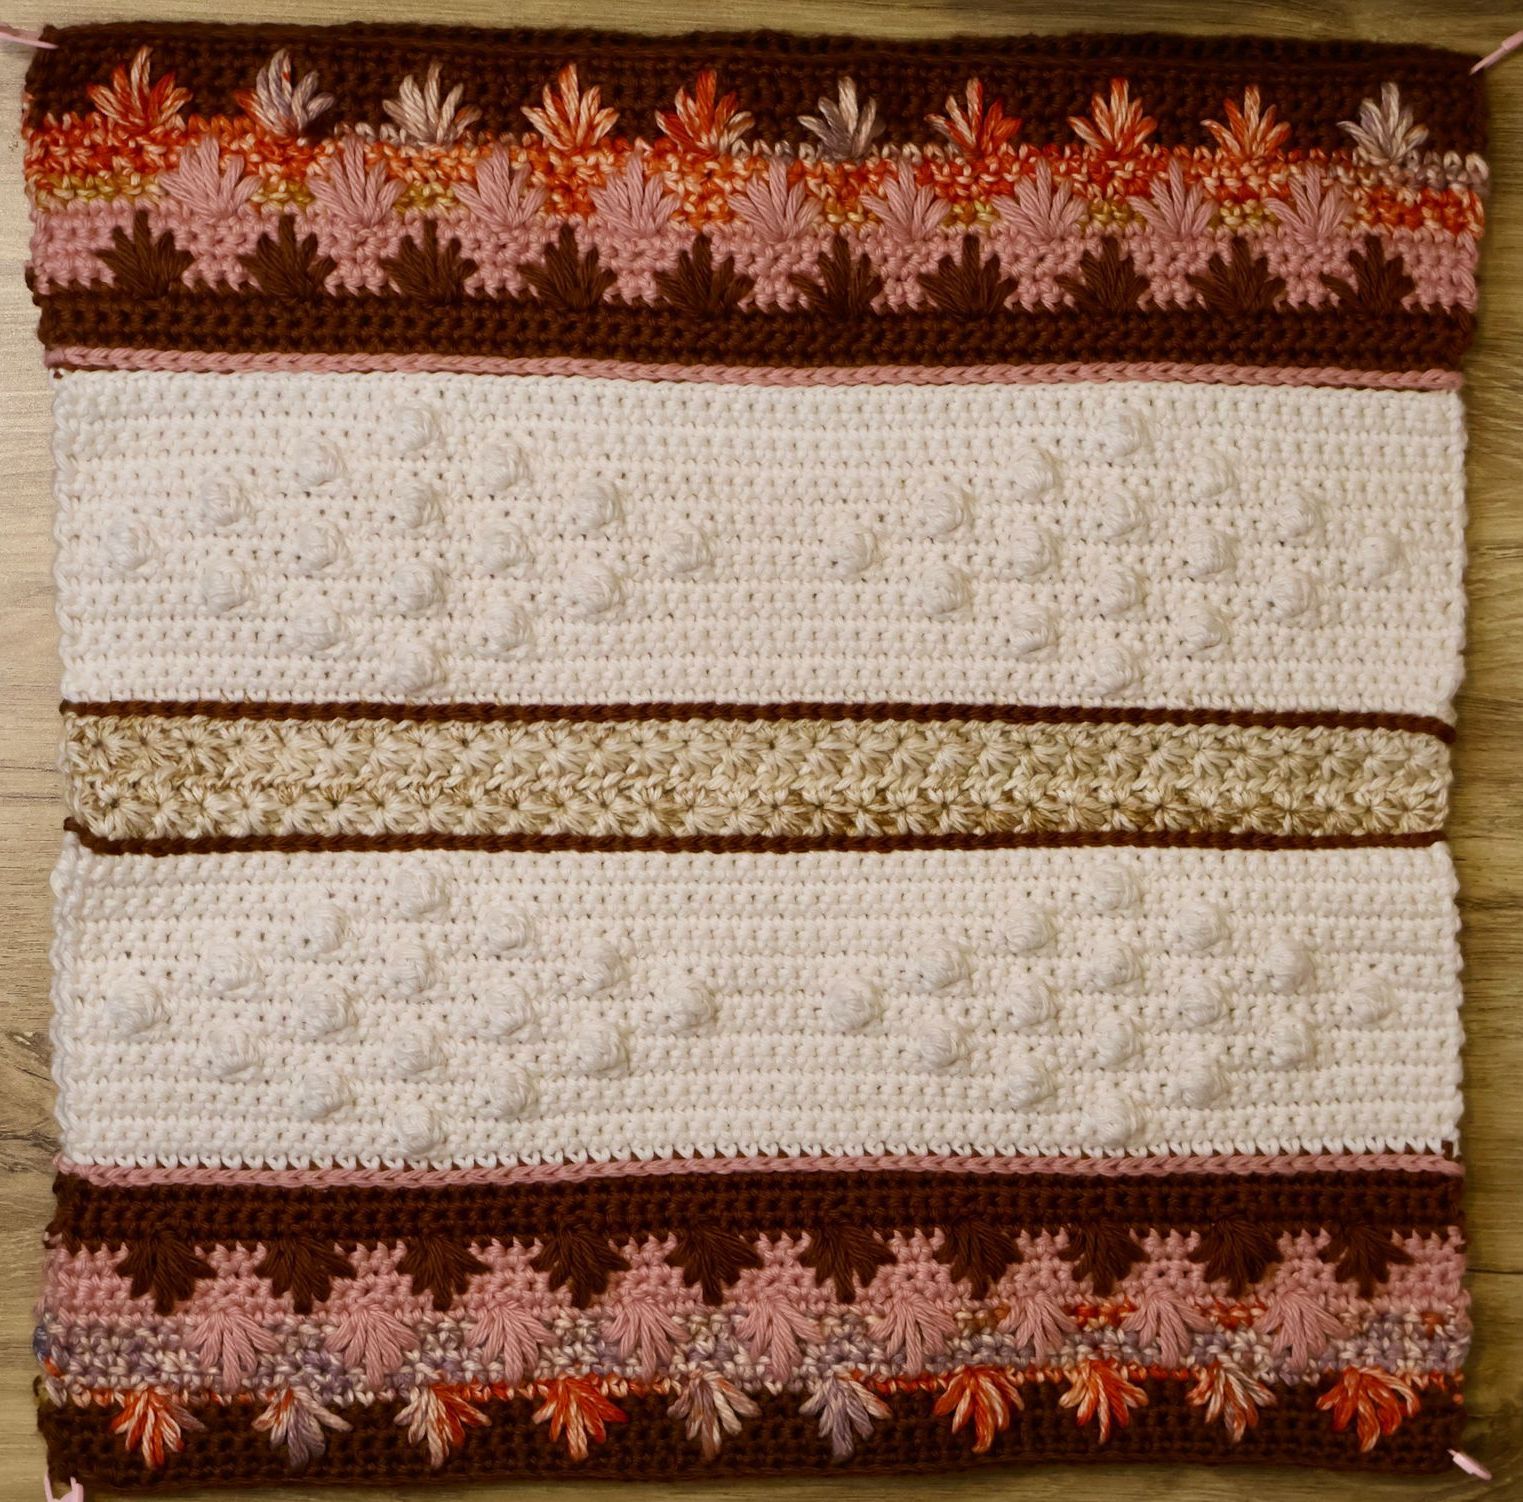
This pillow is made with soft, breathable cotton yarn in a mix of warm, earthy tones—creams, browns, pinks, and a touch of peach. It’s got a ton of texture, which I love, and it adds a handmade charm to whatever room it’s in. I used a bunch of different stitches to keep things interesting. At the top and bottom, I used the five-point spike stitch, which gives this beautiful layered effect. The stitches reach down over multiple rows, pulling up different colors and creating a look that almost reminds me of little floral bursts. It adds just the right amount of visual interest without being too busy. The second and fourth rows are bobbles that pop up off the surface (they’re so fun to make), and a star-like stitch in the middle section that adds a nice contrast.
One of the coolest parts is how each side of the pillow is made from two separate pieces that are joined together so the design is perfectly symmetrical. It makes everything feel balanced and intentional.
To pull everything together, I added a border around the edge using several of the same colors from the body of the pillow. It kind of frames the whole piece and gives it a polished look.
This pillow is more than just a decorative piece—it’s something I enjoyed making, and now it’s part of my space. It’s one of those projects that reminds me why I love to crochet: it’s relaxing and creative, and in the end, you have something special to show for your time.
Dusty Desert Throw Pillow Pattern
Materials:
Knit and Crochet Essential Cotton
lightweight size 3 in colors:
#1 Sequoia(1)
#2 Santa Fe(1)
#3 Rose Garden(1)
#4 Cream(2)
#5 Var White Sands(1)
Crochet hook size 7 (4.5mm)
Scissors
Stitch marker
Abbreviations:
Single crochet= sc
Chain= ch
Stitch or stitches= st or sts
Slip Stitch: sl st
Space=sp
Yarn over: yo
5 point spike stitch: spike st
Bobble stitch: bo
Half Double Crochet= hdc
Loop or Loops= lp or lps
Right side: RS
Wrong side: WS
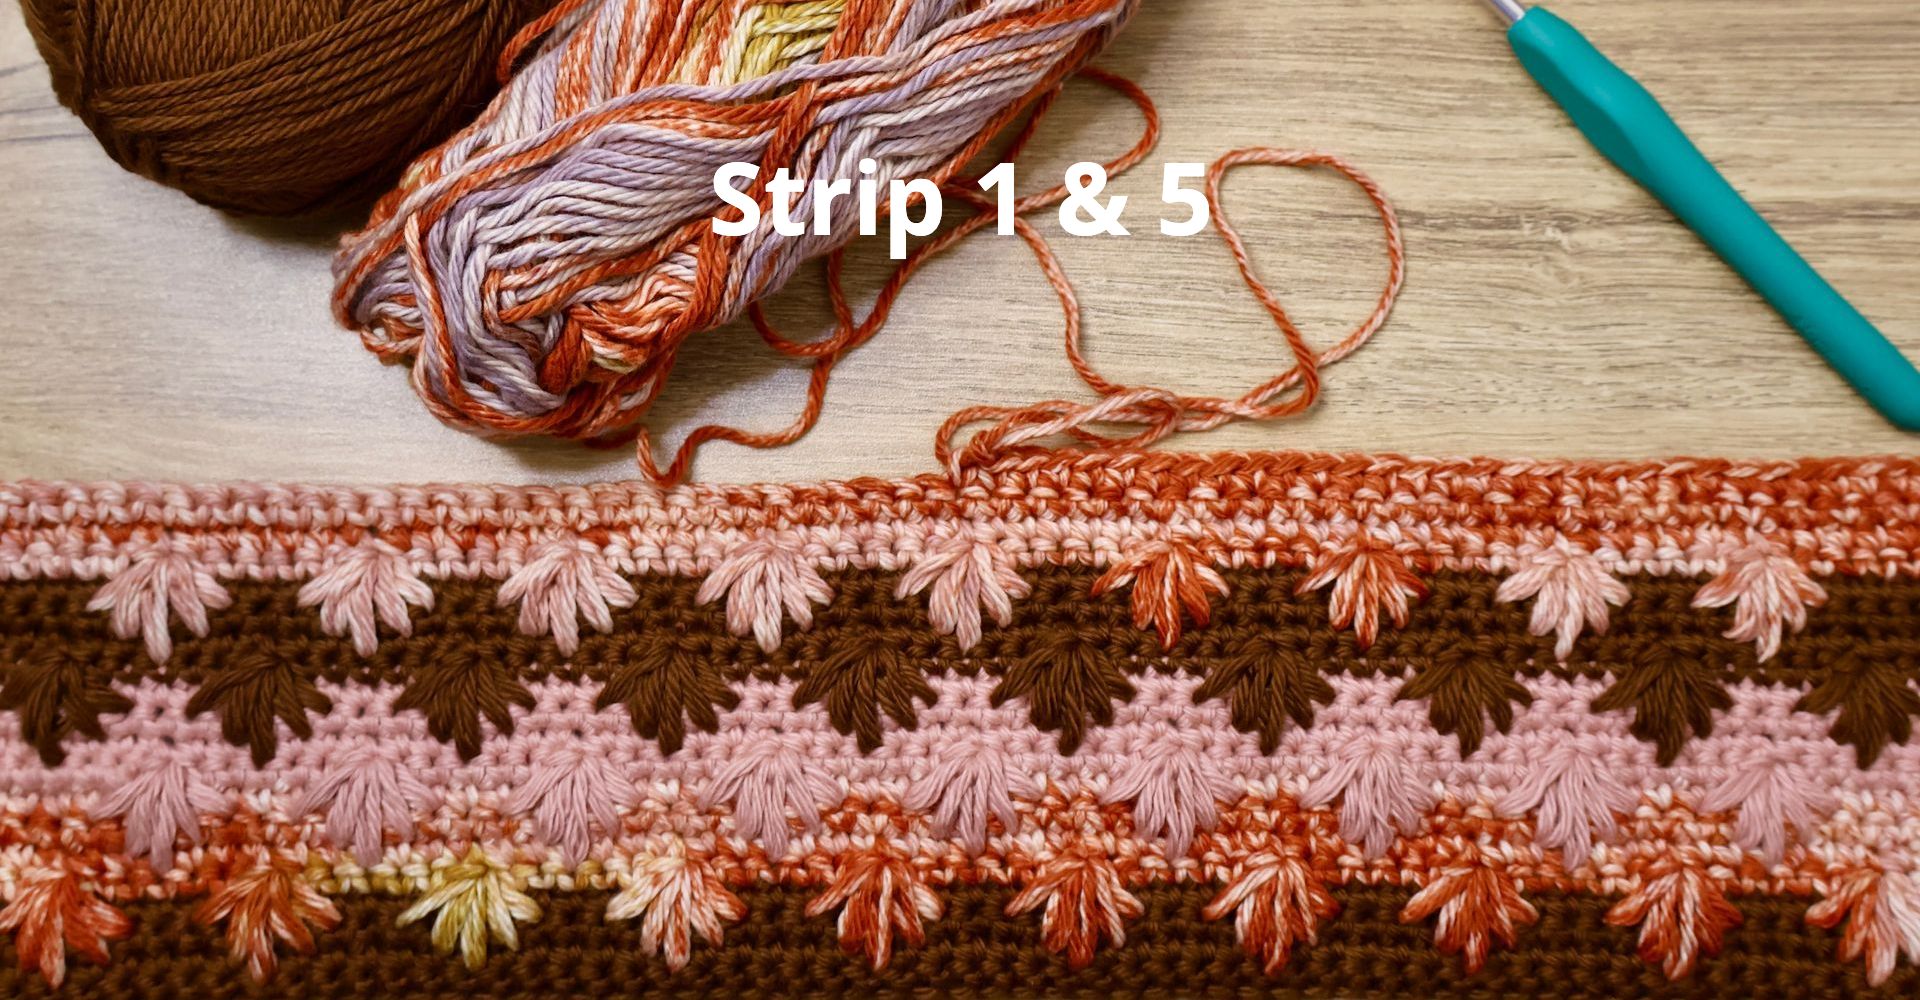
Strip 1:
Special stitch: 5 point spike stitch: spike st
First spike: Yo, insert hook into sc 2 sc to right and 1 row below, pull up loop.
Second spike: Yo, insert hook into sc 1 sc to right and 2 rows below, yo and pull up loop.
Third spike: Yo, insert hook 3 rows below, pull up loop.
Fourth spike: Yo, insert hook into sc 1 sc to left and 2 rows below, pull up loop.
Fifth spike: Yo, insert hook into sc 2 sc to left and 1 row below, pull up loop.
Finish: Yo, pull through all 11 lps on hook, ch 1.
Using color Sequoia start with a slip knot on your crochet hook, ch 64
(RS) Row 1: Sc in the second chain from the hook, sc in each chain across, turn.(63)
(WS-RS-WS) Row 2-4: Ch 1, sc in each sc across, at the end of row 4 change color to Sante Fe, turn.(63)
(RS) Row 5: Ch 1, sc in the next 4 sc, [skip next sc and place a stitch marker in the next sc(this will be the first stitch worked into after the spike st is worked), spike st in the next sc, 5 sc in the next 5 sc starting with the marked stitch] repeat all the way across with 4 sc st at the end, turn. (10 spike sts)
(WS) Row 6: Ch 1, sc in each sc across skipping the ch 1 sp over the spike st, turn. (63)
(RS-WS) Row 7-8: Ch 1, sc in each sc across, at the end of row 8 change color to Rose Garden, turn.(63)
(RS) Row 9: Ch 1, sc in the next 7 sc, [skip next sc and place a stitch marker in the next sc(this will be the first stitch worked into after the spike st is worked), spike st in the next sc, 5 sc in the next 5 sc starting with the marked stitch] repeat all the way across with 7 sc st at the end, turn. (9 spike sts)
(WS) Row 10: Ch 1, sc in each sc across skipping the ch 1 sp over the spike st, turn. (63)
(RS-WS) Row 11-12: Ch 1, sc in each sc across, at the end of row 12 change color to Sequoia, turn.(63)
(RS) Row 13: Ch 1, sc in the next 4 sc, [skip next sc and place a stitch marker in the next sc(this will be the first stitch worked into after the spike st is worked), spike st in the next sc, 5 sc in the next 5 sc starting with the marked stitch] repeat all the way across with 4 sc st at the end, turn. (10 spike sts)
(WS) Row 14: Ch 1, sc in each sc across skipping the ch 1 sp over the spike st, turn. (63)
(RS-WS) Row 15-16: Ch 1, sc in each sc across, at the end of row 16 change to color Cream to start strip 2. (63)
*Finished Measurement 17 inches wide x 3 inches tall
Strip 2:
Special Stitch Bobble=bo: [Yo, insert hook in indicated st, yo, pull up lp, yo, pull through first 2 lps on hook]4 times, yo, pull through all 5 loops on hook.
(RS-WS) Row 1-2: Ch 1, sc in each st across, turn. (63)
(RS) Row 3: Ch 1, 15 sc in the next 15 sc, bo in the next sc, 31 sc in the next 31 sc, bo in the next sc, 15 sc in the next 15 sc, turn. (63) Row bo count: 2
(WS) Row 4: Ch 1, sc in each sc across, turn. (63)
(RS) Row 5: Ch 1, 11 sc in the next 11 sc, bo in the next sc, 7 sc in the next 7 sc, bo in the next sc, 23 sc in the next 23 sc, bo in the next sc, 7 sc in the next 7 sc, bo in the next sc, 11 sc in the next 11 sc, turn. (63) Row bo count: 4
(WS) Row 6: Ch 1, sc in each st across, turn. (63)
(RS) Row 7: Ch 1, 7 sc in the next 7 sc, bo in the next sc, 7 sc in the next 7 sc, bo in the next sc, 7 sc in the next 7 sc, bo in the next sc, 15 sc in the next 15 sc, bo in the next sc, 7 sc in the next 7 sc, bo in the next sc, 7 sc in the next 7 sc, bo in the next sc, 7 sc in the next 7 sc, turn. (63) Row bo count: 6
(WS) Row 8: Ch 1, sc in each st across, turn. (63)
(RS) Row 9: Ch 1, 3 sc in the next 3 sc, bo in the next sc, (7 sc in the next 7 sc, bo in the next sc) repeat 7 times, 3 sc in the next 3 sc, turn. (63) Row bo count: 8
(WS) Row 10: Ch 1, sc in each st across, turn. (63)
(RS) Row 11: Ch 1, 7 sc in the next 7 sc, bo in the next sc, 7 sc in the next 7 sc, bo in the next sc, 7 sc in the next 7 sc, bo in the next sc, 15 sc in the next 15 sc, bo in the next sc, 7 sc in the next 7 sc, bo in the next sc, 7 sc in the next 7 sc, bo in the next sc, 7 sc in the next 7 sc, turn. (63) Row bo count: 6
(WS) Row 12: Ch 1, sc in each st across, turn. (63)
(RS) Row 13: Ch 1, 11 sc in the next 11 sc, bo in the next sc, 7 sc in the next 7 sc, bo in the next sc, 23 sc in the next 23 sc, bo in the next sc, 7 sc in the next 7 sc, bo in the next sc, 11 sc in the next 11 sc, turn. (63) Row bo count: 4
(WS) Row 14: Ch 1, sc in each st across, turn. (63)
(RS) Row 15: Ch 1, 15 sc in the next 15 sc, bo in the next sc, 31 sc in the next 31 sc, bo in the next sc, 15 sc in the next 15 sc, turn. (63) Row bo count: 2
(WS) Row 16: Ch 1, sc in each st across, turn.
(RS) Row 17: Ch 1, sc in each st across. Fasten off Cream. This finishes on the right side.
*Finished Measurement 17 inches wide x 3.5 inches tall
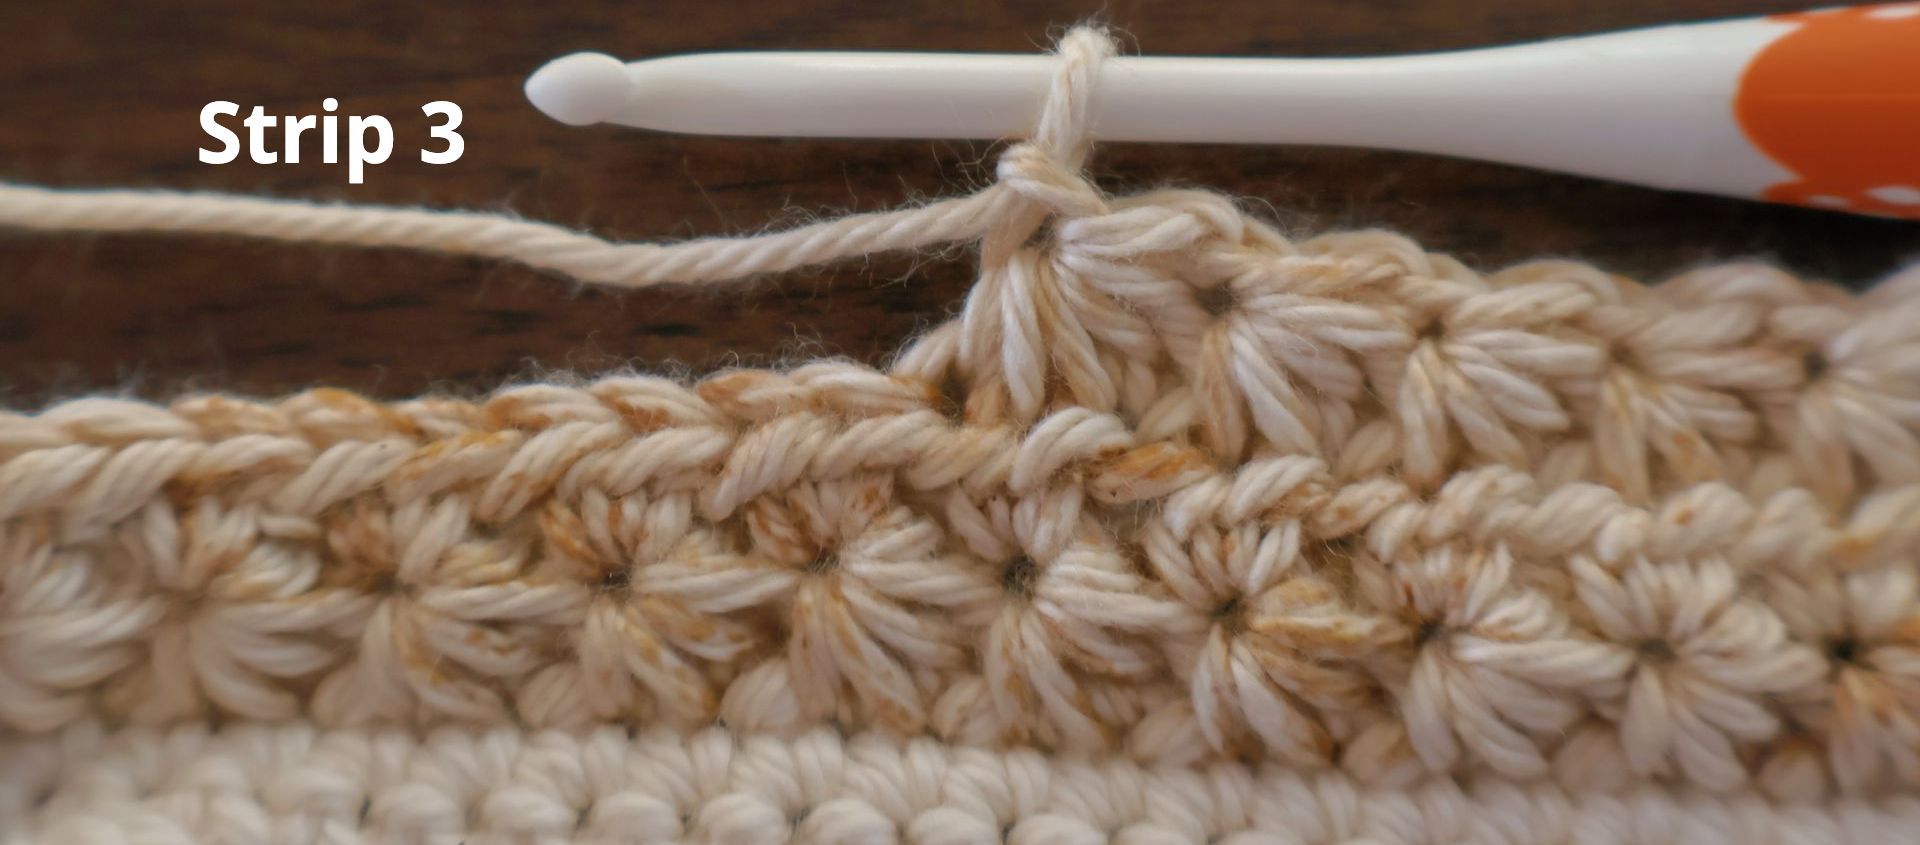
Strip 3:
(RS) Row 1:
Special stitch: Star Stitch
First star: Keep your work on the RS and join color Var White Sands in the first sc st of row 17, ch 3, insert hook in the second ch from the hook and pull up a lp, insert hook in the next ch and pull up a lp, insert hook into the sc you started in and pull up a lp, insert hook in the next sc and pull up a lp, insert hook in the next sc and pull up a lp, yo and pull through all 6 lps on the hook, ch 1(first star made),
Second star: insert hook into the ch 1 sp of previous star and pull up lp, insert hook into the side of the previous star stitch and pull up lp, insert hook into the base of the previous star st and pull up a loop, [insert hook into the next sc and pull up lp] twice, yo and pull through all 6 lps on hook, ch 1. Repeat second star all the way across to the last st, hdc in the last st, turn. (31 stars, 1 hdc)
(WS) Row 2: Ch 2(this ch 2 does not count as a st), 2 hdc in the eye of each star all the way across, end with 1 hdc in the ch 3 st that the previous row started with, turn. (63)
(RS) Row 3: Repeat row 1
(WS) Row 4: Repeat row 2, change color to Cream in the last st and fasten of Var White Sands, turn.
*Finished Measurement 14 inches wide x 1 in tall
Strip 4: Repeat strip 2.
Strip 5: Repeat strip 1. *This strip is worked separately from the other 4 strips. This is to achieve symmetry with the pillow pattern.
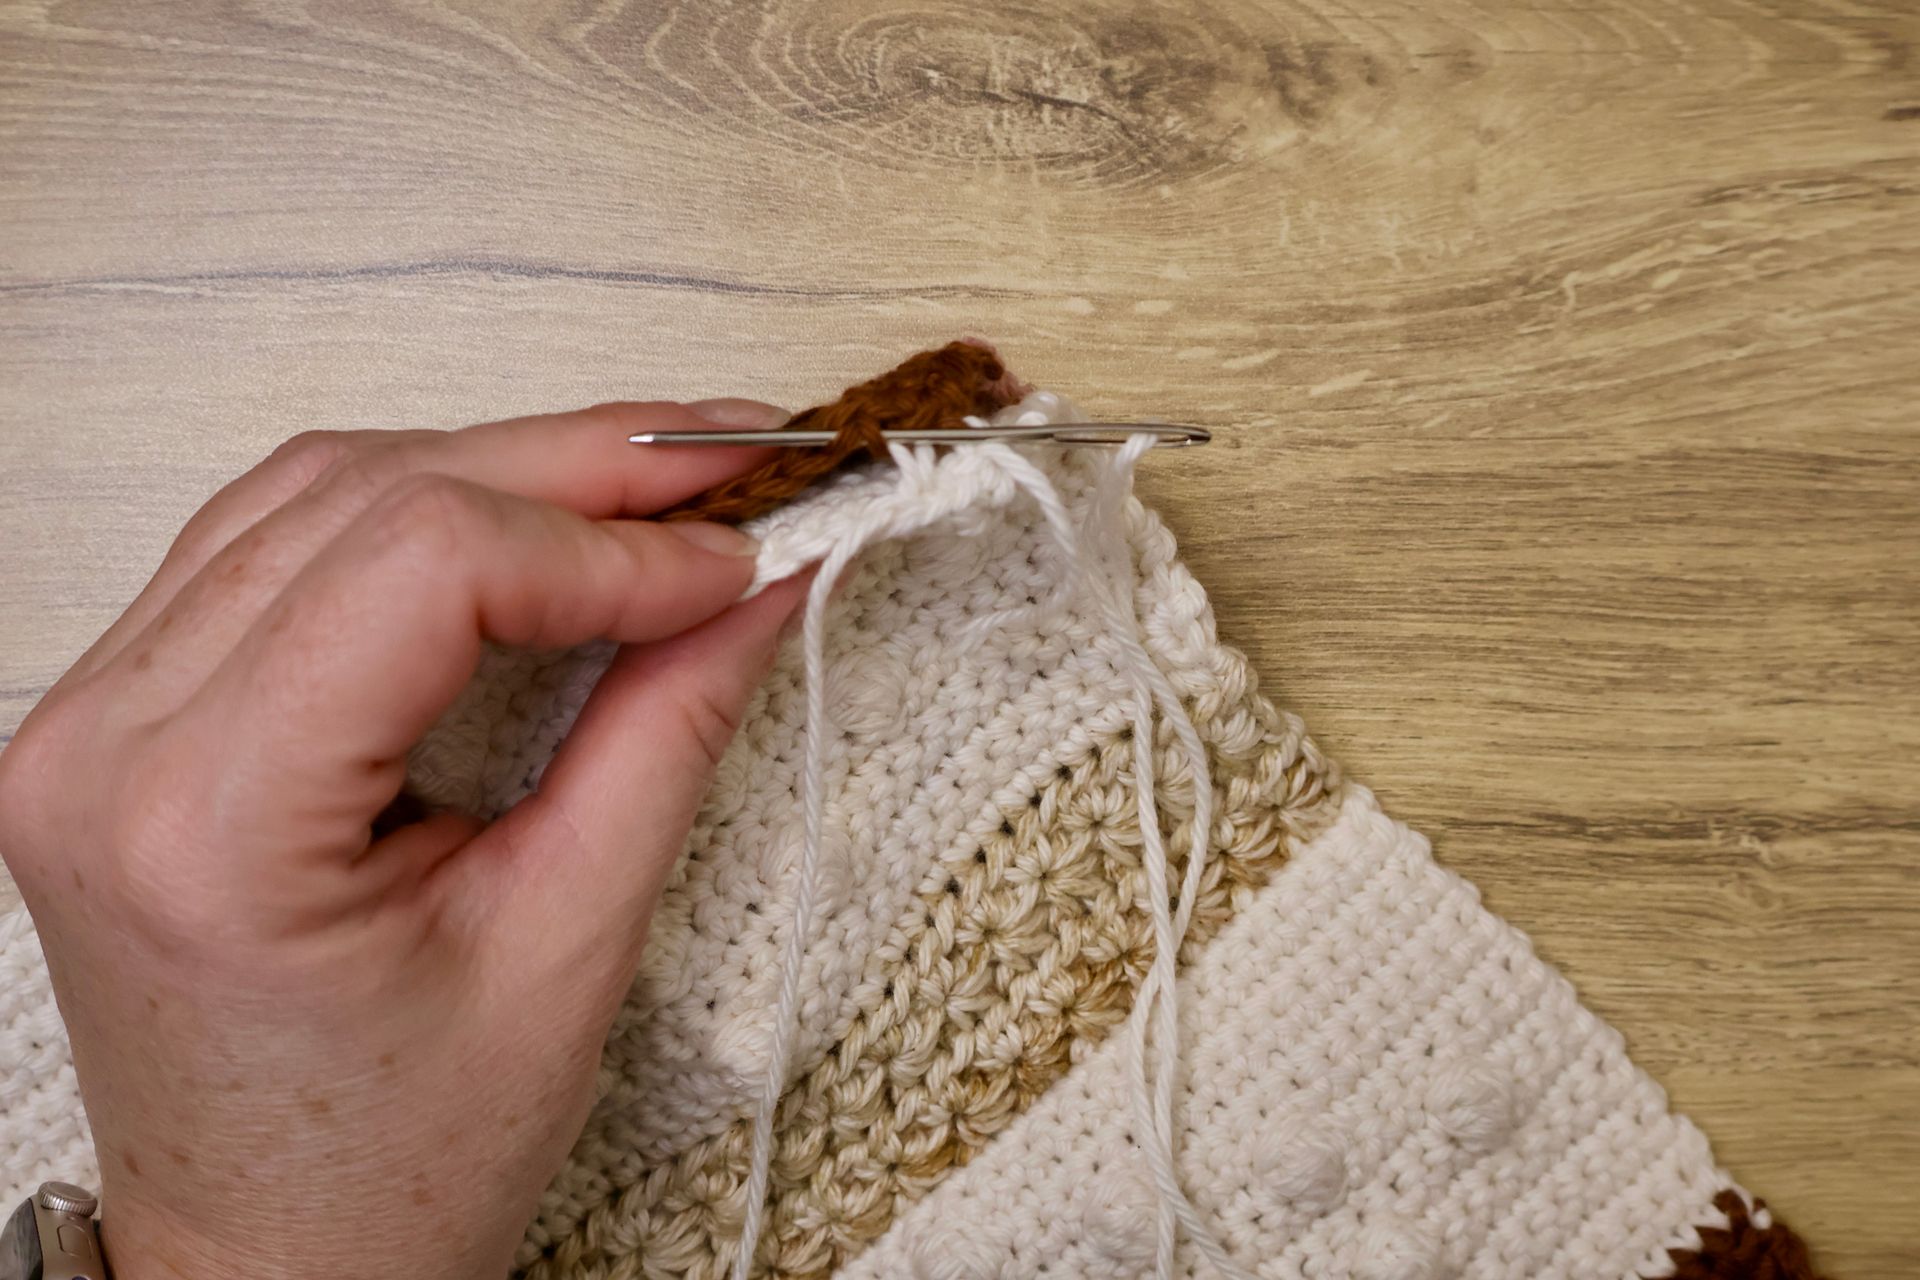
Once strip 5 is completed join both top edges together using an invisible join with the color Cream.
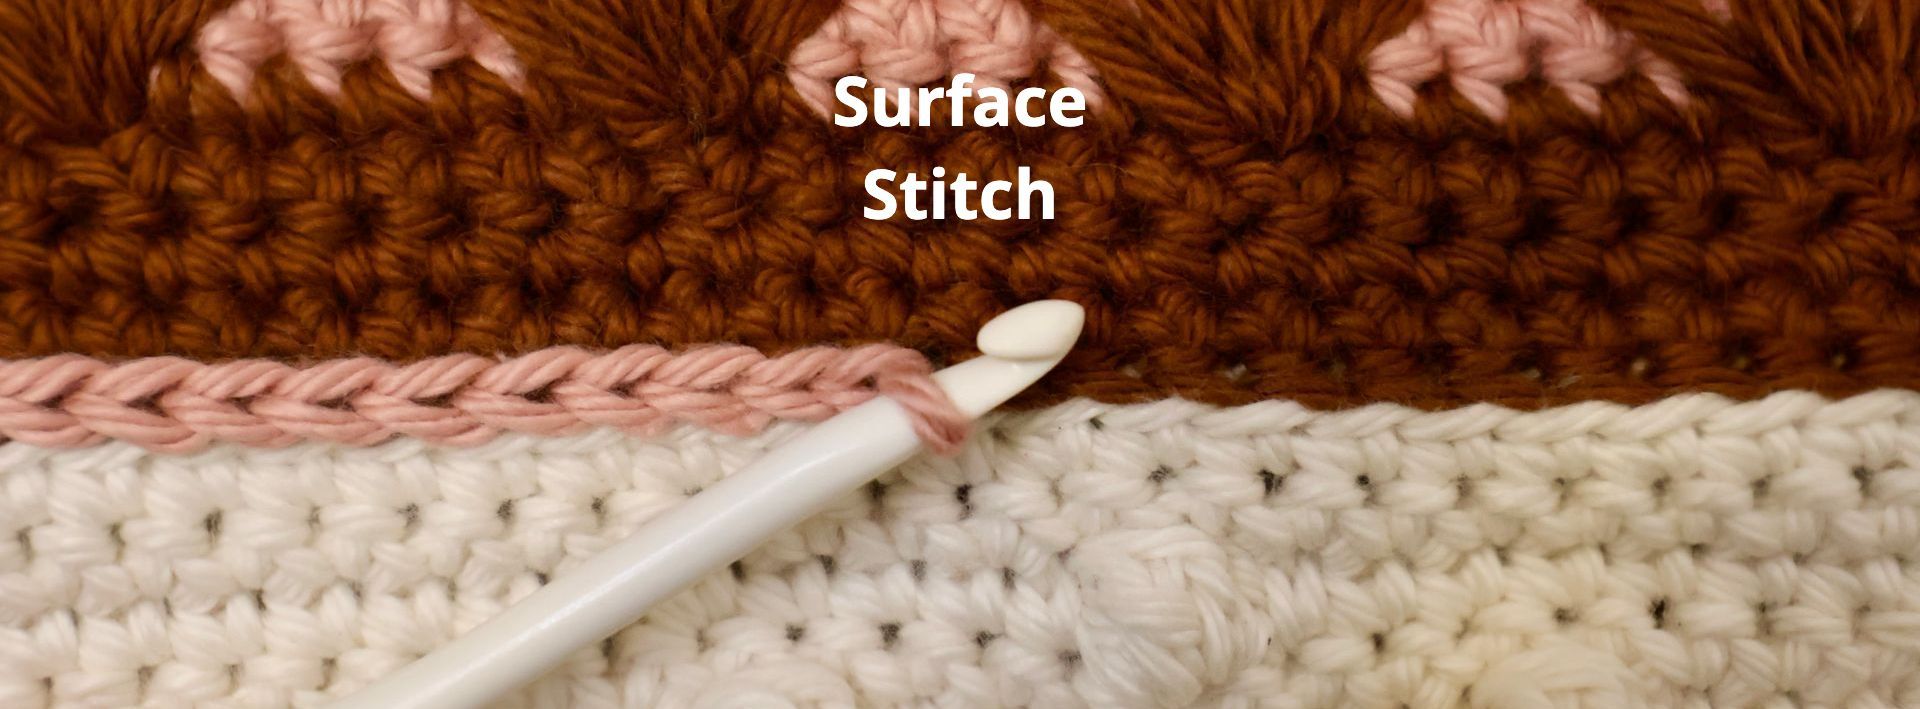
Surface Stitch Detail:
RS: Between strip 1 and strip 2 using Rose Garden join yarn and surface stitch all the way across(63), fasten off yarn.
Between strip 2 and strip 3 using Sequoia join the yarn and surface stitch all the way across(63), fasten off yarn.
Between strip 3 and strip 4 using Sequoia join the yarn and surface stitch all the way across(63), fasten off yarn.
Between strip 4 and strip 5 using Rose Garden join yarn and surface stitch all the way across(63), fasten off yarn.
The piece will measure 14x14.
Border
RS:
Round 1:
Top of Border: In the right corner join color Santa Fe and 62 sc in each st across. When you get to the last st on the top 1 sc(63), ch 2, 1 sc in the same st. This creates a corner. Mark the corner ch 2 sp with a stitch marker.
Left Side of Border: 62 sc across the side.
Stitch count for each strip:
Strip 1: 13
Strip 2: 16
Strip 3: 5
Strip 4: 16
Strip 5: 13
When you get to the last st on the side 1 sc(63), ch 2, 1 sc, mark the corner ch 2 sp with a stitch marker.
Bottom of Border: 62 sc in each st across, in corner 1 sc(63), ch 2, 1 sc, mark the corner ch 2 sp with a stitch marker.
Right Side of Border: 62 sc across the side.
Stitch count for each strip:
Strip 1: 13
Strip 2: 16
Strip 3: 5
Strip 4: 16
Strip 5: 13
When you get to the last st on the top 1 sc(63), ch 2, join into the first st made, mark the corner ch 2 sp with a stitch marker.
*Each side will have a st count of 63 with ch 2 in each corner.
Round 2:
Top of Border: Start in the st that round 1 was finished and 63 sc in each stitch across, in the corner that is marked by the stitch marker 1 sc(64), ch 2, 1 sc,
Left Side of Border: 64 sc in each st across side 1, in the corner that is marked by the stitch marker 1 sc(65), ch 2, 1 sc
Bottom of Border: Repeat side 1(65).
Right Side of Border: 64 sc in each st across side 2, in the corner that is marked by the stitch marker 1 sc(65), ch 2, 1 sc, join to the start of round 2 on top. The last sc completes the 65th st on the top.
*Each side will have a st count of 65 with ch 2 in each corner.
Round 3:
Top of Border: Start in the st that round 2 was finished and 65 sc in each stitch across, in the corner that is marked by the stitch marker 1 sc(66), ch 2, 1 sc.
Left Side of Border: 66 sc in each st across side 1, in the corner that is marked by the stitch marker 1 sc(67), ch 2, 1 sc
Bottom of Border: Repeat side 1(67).
Right side of Border: 66 sc in each st across side 2, in the corner that is marked by the stitch marker 1 sc(67), ch 2, 1 sc, join to the start of round 2 on top. The last sc completes the 67th st on the top. Fasten off yarn.
*Each side will have a st count of 67 with ch 2 in each corner.
*The piece will be 15x15 after the border is added
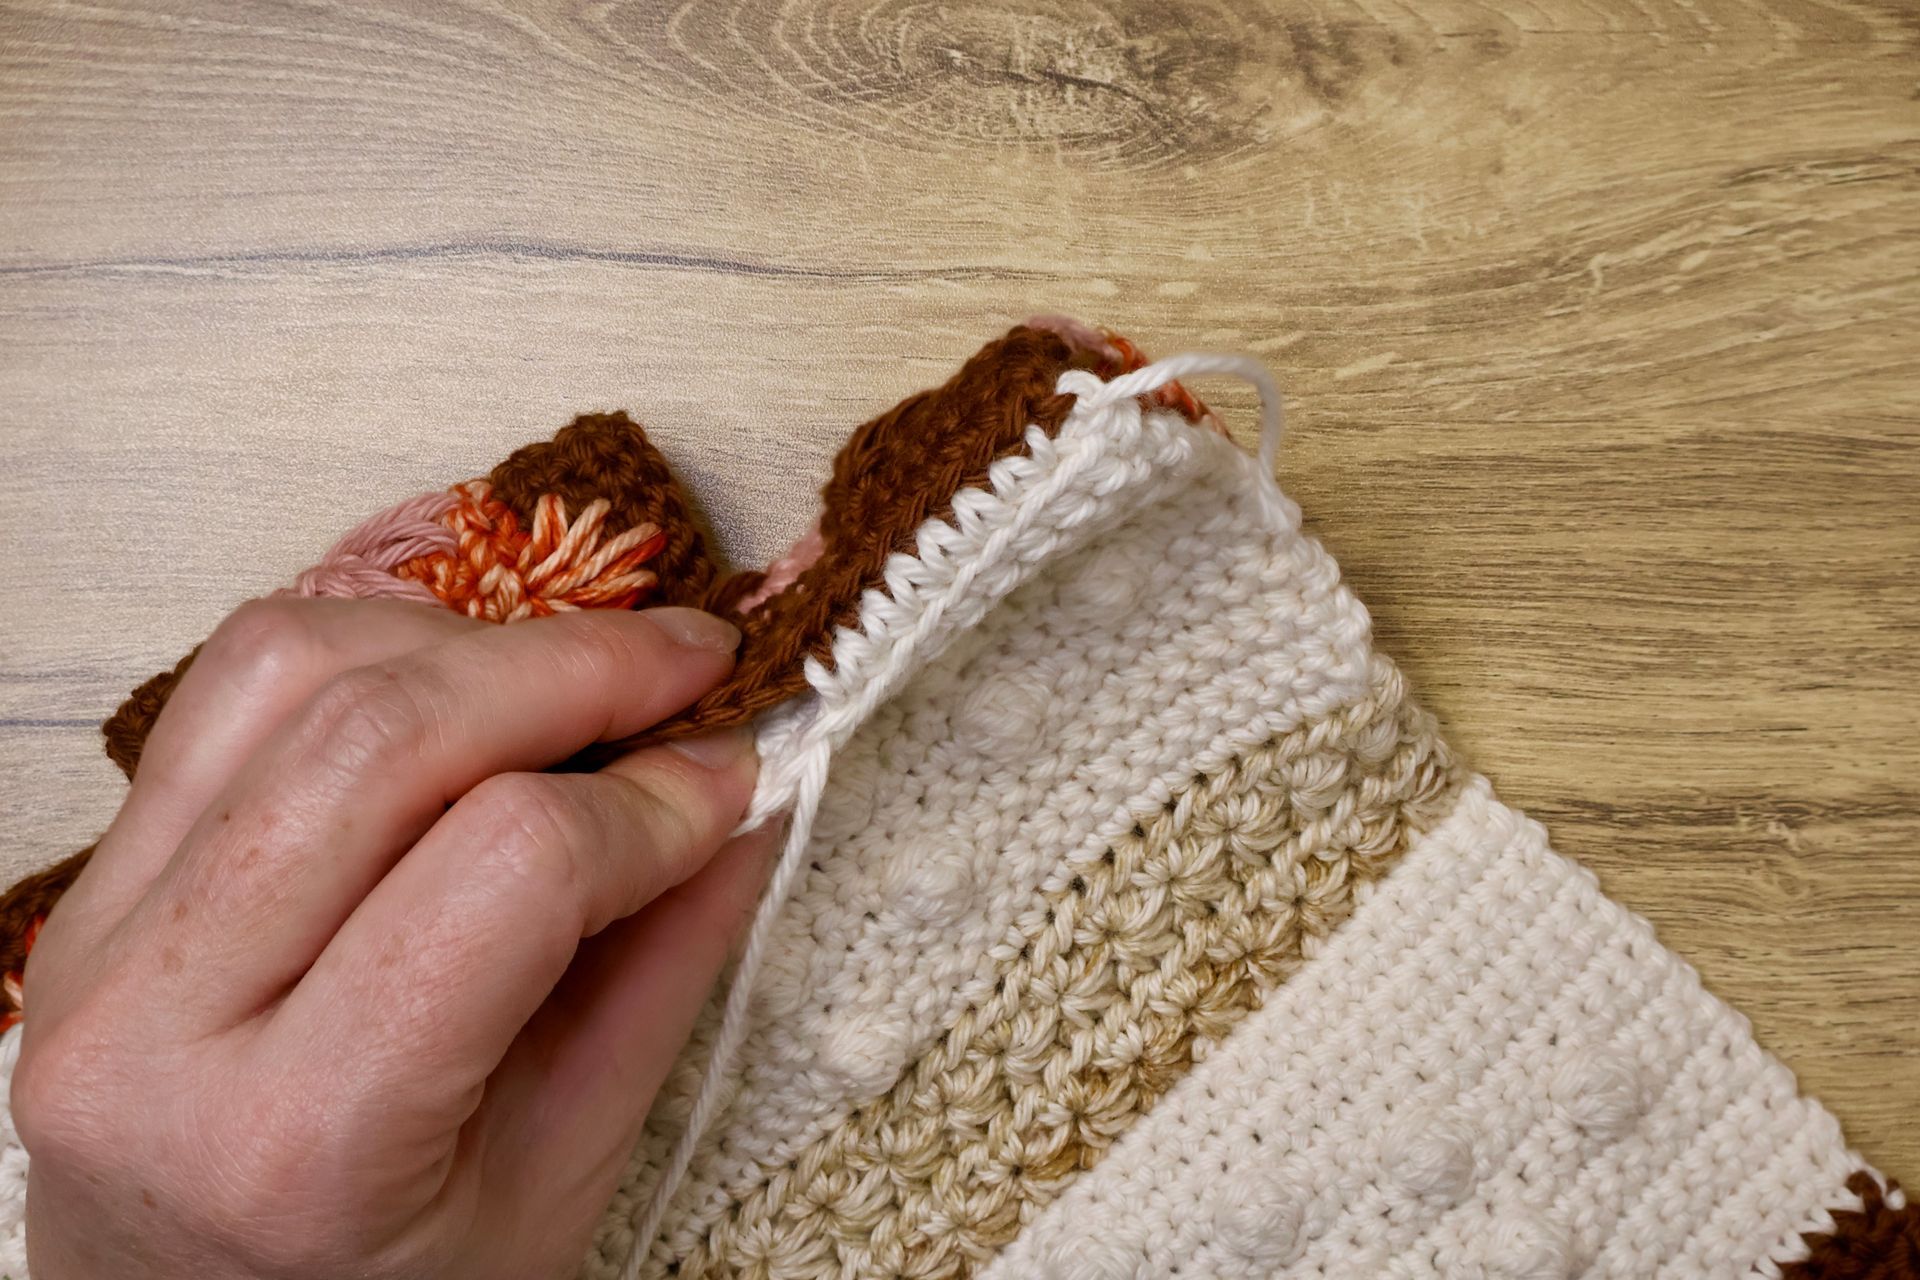
Surface Stitch Detail: Join color Rose Garden in the top right corner where the border started. Surface st between the colors Sequoia and Santa Fe until you reach the next corner(62), turn and surface st between side 1 and the border(62), turn and and surface st between bottom and border(62), turn and surface stitch between side 2 and border(62). Finish in the same stitch that you started in. Fasten off.

Repeat all above instructions for pillow side 2
Finish: In color Rose Garden join together both sides with the RS facing outward. Compare both sides to make sure the pattern is going the same direction. Insert hook through both pillow sides in the first sc on any corner, sc through both sides all the way across(67), in the corner ch 2 sp 1 sc(68), ch 2, 1 sc, insert pillow between the crochet pieces and close sides around it, sc In the last corner sl st into the first sc that started the round, and fasten off. You're done! Congratulations! Admire your work and onto the next project.